Log into your account and select the correct access level:
- Log into your School Group Manager account.
- Click on ‘Admin’ shown on the landing page at the top to the left of your profile icon.
- Click on 'Compliance Management' in the left hand navigation.
- Select 'Policy Manager'.
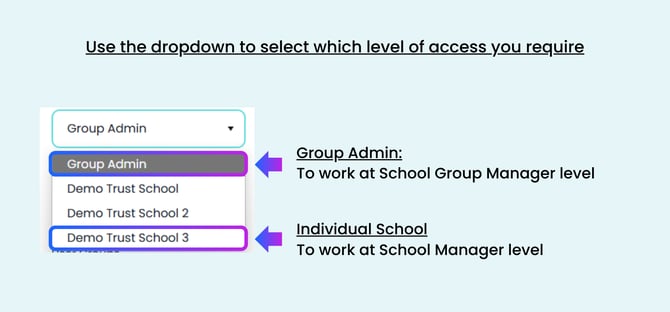
- To create as a School Group Manager ensure you have selected 'Group Admin'.
Click '+ Create policy':
- Click the
 button and select 'Migrate a Good Practice' from the pop up options.
- Depending on the options you choose you will navigate through up to 5 steps to create the policy:
- You'll navigate through at least 4 steps in order to create the policy if you do not want to control the reading team:
![]()
-
If you as the Group School Manager want to assign the reading team, you'll navigate through 5 steps

1. Configure:
- Attach the existing policy by clicking the 'Choose File' button.
- Fill out the 'Document name' field.
- Add the 'Review date' by clicking on the calendar icon - ensure this matches the review date stated in your policy document.
- Enter the 'CPD Hours'. This will add to the total CPD hours of all readers and approvers.
- Select up to 3 individuals who will be responsible for the policy from the drop down. You will be selected automatically but you can choose to unselect yourself.
- Select the appropriate requirements by using the tick boxes.
- Tick 'Requires approval' if the policy previously required approving.
- Tick 'Requires reading' if there previously there were certain members of staff who were required to read the policy.
- Once you're happy that the details are correct, click 'Save and continue'.
ℹ️ Since you are migrating an existing policy, anyone you name in the 'Approval Team' or 'Reading Team' during migration will not be notified since they have already read or approved the policy.
2. Distribution
- Use the dropdown to select the schools that you wish the policy to be distributed to.
- Select if you would like the schools to be able to amend the Policy to make it relevant to their school:

ℹ️ If you, as School Group Manager, wish to add the users who previously had to confirm that they had read the policy, you need to select Non-Amendable. This means the reading team you select cannot be changed at School level.
- If 'Requires Reading' was previously selected, you now decide how you want the readers to be managed.

- Click 'Save and continue'.
3. Approved by:
In this section you will add the members of staff who previously approved the document
- Filter by group using the drop down, or select individuals from the left hand column.
- When you have selected all those who originally approved the policy document click on the single, right hand arrow.
- Click on 'Save and continue'.
4. Read by (If Group Admin Manages Readers was selected)
- Use the radio buttons to toggle between assigning either 'Individual Users' or 'User Groups' as the Reading Team.
- For Individual Users:
- Search, filter by group using the drop down, or select individuals from the left hand column.
- Click on the single, right hand arrow to add the selected individuals to the Reading team.
- For User Groups:
- For Individual Users:
-
-
- Use the drop down and tick against all the User Groups you wish to add to the Reading Team
-
- Select an 'Reading deadline'
- Click on 'Save and continue'.
5. Confirmation
- You will see a summary of the policy where you have the option to download or review.
- If you didn't tick 'Requires approval' and/or 'Requires reading' you wont see the green and blue dials on the right hand side.

- If you are you are happy with the details, click on the 'Migrate policy' button.
- You will see the status change to 'Complete', the policy sharing link will become visible, and the creation date will reflect the date that the policy was migrated.
