How do I create a policy? (Statutory Policy)
Only school managers and school group managers can access and or create a policy through the Policy Manager feature.
To create a policy this can be done in two ways depending on the type of policy you wish to create.
Statutory Policy
The statutory policy create tool allows you to construct policies for your school. Statutory policies have been pre-populated based on your school type, you can also download and edit the up-to-date templates provided or upload your school's existing template.
The policy upload tool allows you to add policies for your school that are outside of the statutory remit. You can choose a template from our library of up-to-date policies, or you can create your own custom policy using your school's existing template.
Creating a Statutory Policy
You will need to be logged into your school manager account.
- Once logged in Click on ‘Admin’ shown on the landing page at the top to the left of your profile icon.
- To the left of the page, you will see the filter ‘Compliance Management' then select 'Policy Manager’
From this page you will see the list of all of your policies. The Policies are listed and have easy references to identify what type they are indicated by a G = Good Practice or a S = for Statutory.
To search for the policy, you can use the search bar at the top or scroll down the list. Once you have located the policy that you want to upload, please select the 3 dots to the right of the placeholder and select Action.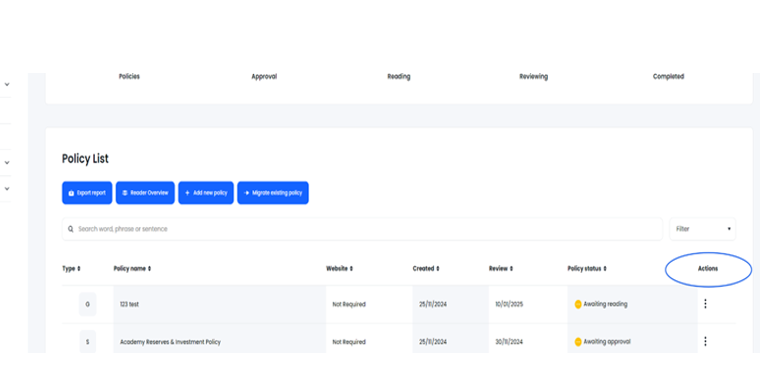
You will now see the options to Create policy and or migrate existing policy

To create a policy from scratch (not uploading a previously approved and read policy) please select Create Policy, this will now take you to the Statutory policy upload page 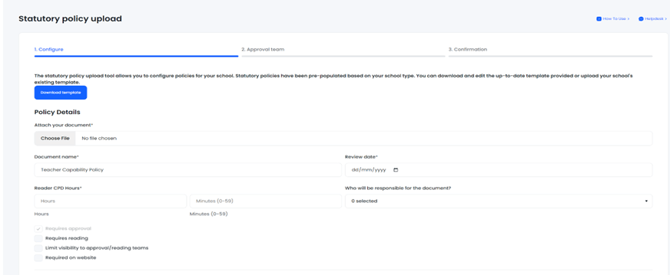
You need to fill in all details as shown
Choose File – this is where you select the policy which you wish to upload. This could be on your own machine or on a server you have access to.
Document name - please insert the name of your policy. This will be auto populated with the name of policy if you have you selected one from the Policy List page.
Review date - This is the date that the policy will need to be reviewed. For example a review date could be a month, 6 months or any date in the future.
Reader CPD Hours / Minutes – Please add in how long you expect this Policy to take to read.
Who will be responsible for the document – The creator of the policy will automatically be the responsible person unless otherwise stated. You can add up to three more people if required.
From this page you have the option to include a Reading Team - The purpose of creating the reading team is so that as school manager you can assign members of staff to read a policy to stay compliant. Creating a reading team is not mandatory for a policy but most will have a reading team assigned. If you wish to include a reading team or person just select this by ticking this as shown below 
Once all the above fields are complete you will now be able to save your uploaded policy by selecting the Save and Continue at the bottom of this page 
Once you click Save and Continue the next page you will see will is Statutory policy upload, this is where you will now select and assign users to be the Approval Team for this policy.
Approval Team – these are users who will be assigned to approve or decline the document. Your approval team tends to be your governors and/or SLT – the people who would check your policy over and suggest any amendments before it gets sent to the reading team. The selected users will have a task created into their “Task List” via there To Do page and will be emailed to confirm a document has been created.
From here, you will be able to allocate your users and user groups available.
To filter by groups already available and created, click the drop-down arrow. This will show all the user groups already created within your admin area.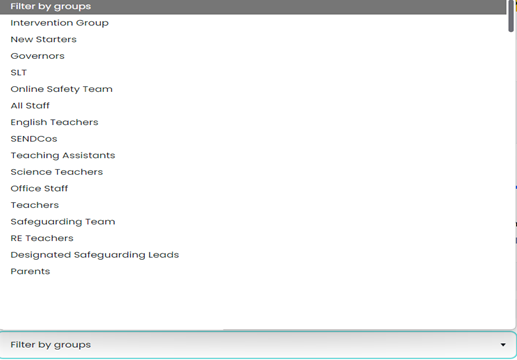
If you wish to assign to specific person/s, you can search the name of the user in the search bar.
To select the individual users you wish to be included in the Approval Team select each one and move across from left to right using the blue arrows*.
*please note, the single blue arrow will move one person at a time, the double will move all staff within the list.
If you wish to add a user group, select the group using Filter by groups option. This will include all users included in this group.
Group Filter Search 
Once the selected users have been highlighted in blue you can then either move them across individually by selecting the signal arrow pointing to the right or all selected in one go by selecting the double arrow also pointing to the right.

Once all the users who need to be included on the Approval team are shown in the Approval Team list, select a date for the deadline of when you need your document to be approved then click the Save and Continue. 
If you selected to have Reading Team you will select the readers in the same way you did for the approval team.
After you have entered the users to be now the Reading Team, click Save and Continue.
Once you have entered all approvers and readers, you will move to the confirmation page. You will be presented with an overview page that will give you all of the information on one page.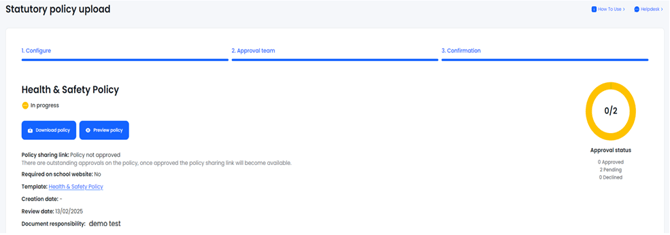
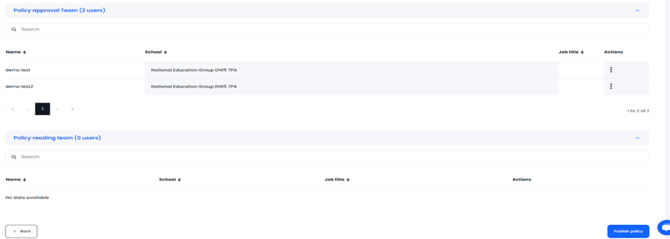
Once you have checked all the detail you can now confirm your Policy upload by clicking the blue Publish policy button at the bottom of the page. Your approvers will receive an email almost instantly telling them that you have assigned the policy to approve.
** If you need to edit or ad in any details during the whole process you have the option to go back to the previous page by using the back button. This is on every page through the creating process** 